-

- いいね!0
 みつぎ@Webアプリ開発者、土木電気通信施工、現場仕事、5児パパ、生成系AI
@mitsugeek
みつぎ@Webアプリ開発者、土木電気通信施工、現場仕事、5児パパ、生成系AI
@mitsugeek
Visual Studio Codeを開いたとき gitがインストールされていない場合、 「Git not found. Install it or configure it using the 'git.path' setting.」と出る。 Google翻訳:「Gitが見つかりませんでした。インストールするか、 'git.path'設定を使用して設定してください。」 pic.twitter.com/Y7xrHNFLCQ
2019-05-21 21:22:38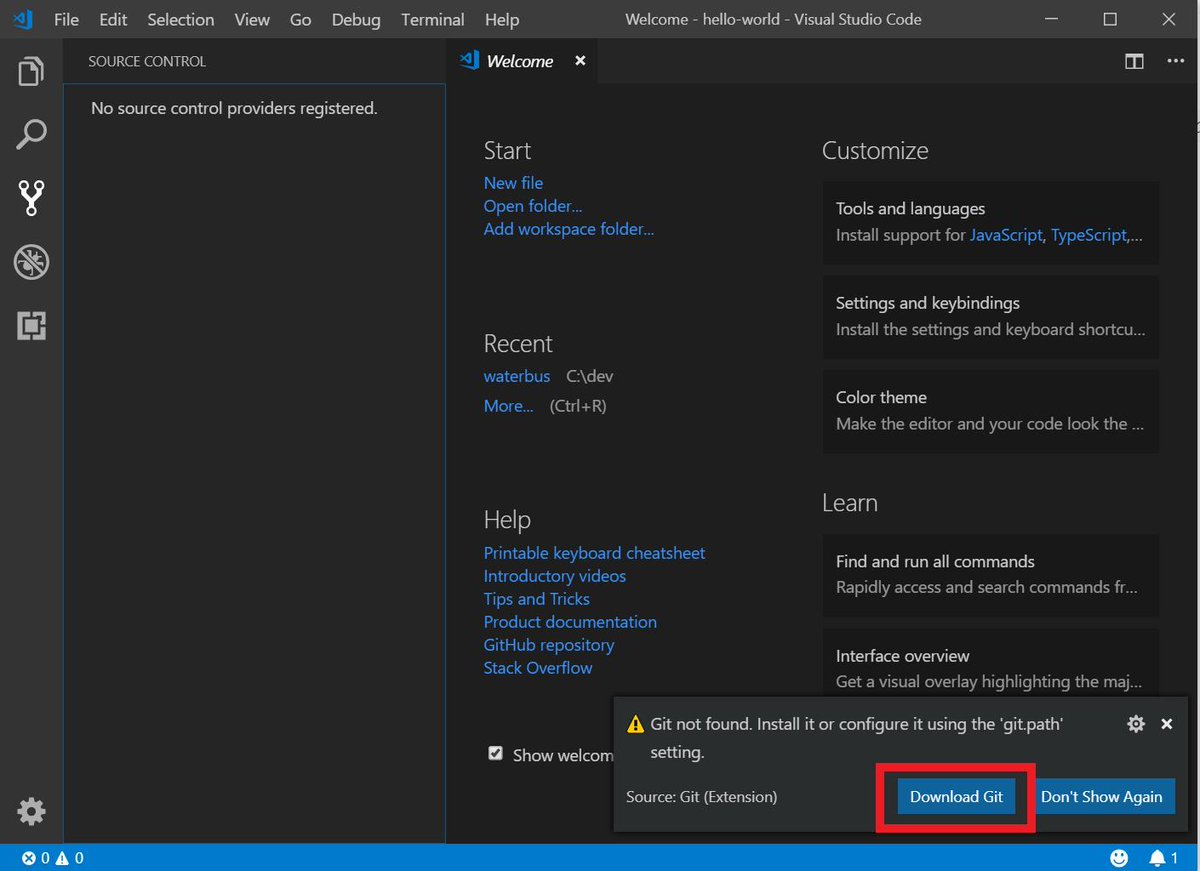 拡大
みつぎ@Webアプリ開発者、土木電気通信施工、現場仕事、5児パパ、生成系AI
@mitsugeek
拡大
みつぎ@Webアプリ開発者、土木電気通信施工、現場仕事、5児パパ、生成系AI
@mitsugeek
Visual Studio CodeのDownload Gitを押すと、 git-scm.com がブラウザで開くので、 「Download 2.21.0 for Windows」のボタンを押してGitをダウンロード pic.twitter.com/dwZyKQci6Y
2019-05-21 21:28:02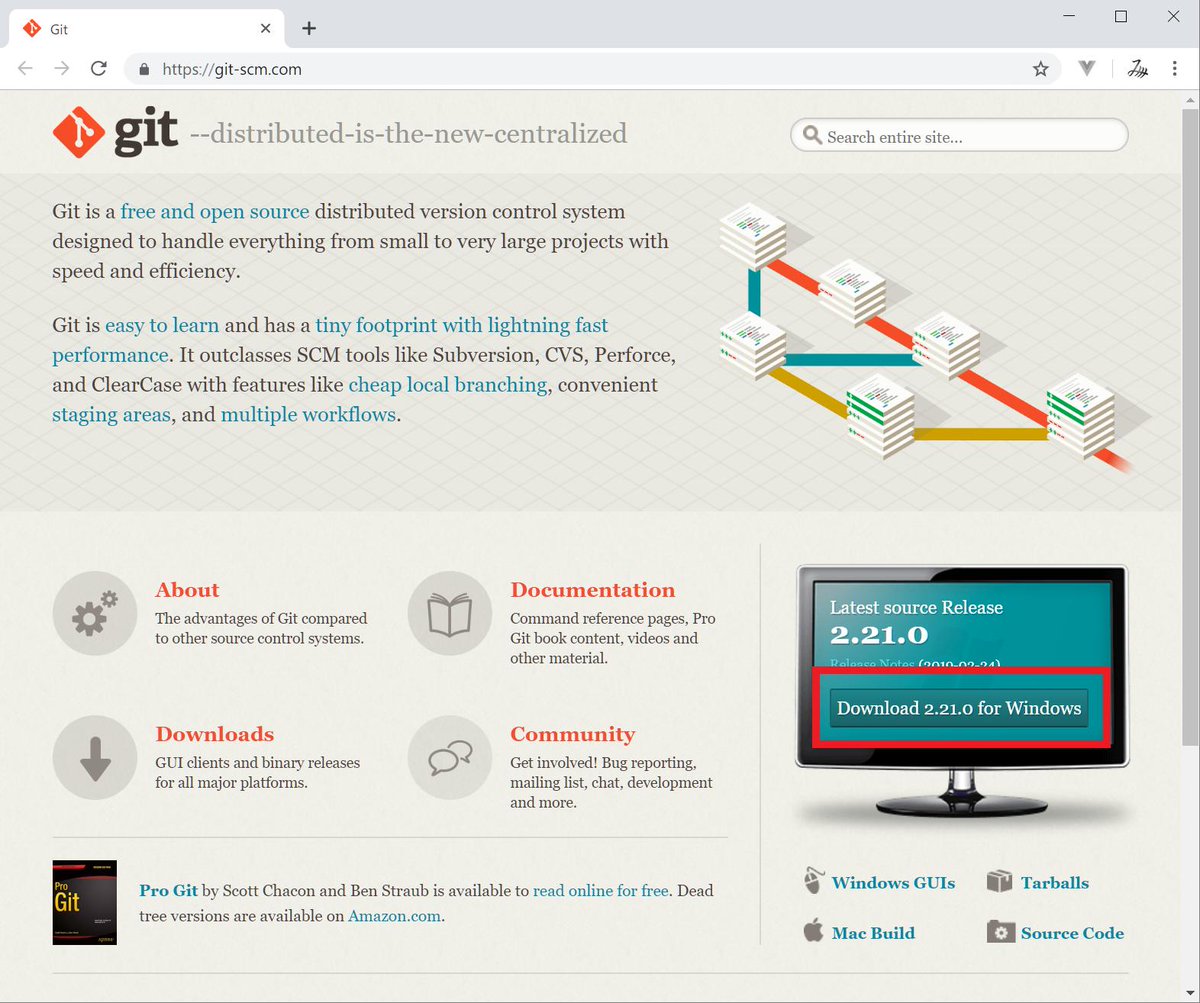 拡大
みつぎ@Webアプリ開発者、土木電気通信施工、現場仕事、5児パパ、生成系AI
@mitsugeek
拡大
みつぎ@Webアプリ開発者、土木電気通信施工、現場仕事、5児パパ、生成系AI
@mitsugeek
Git Download中の様子。 pic.twitter.com/mwxJp4NOxl
2019-05-21 21:30:08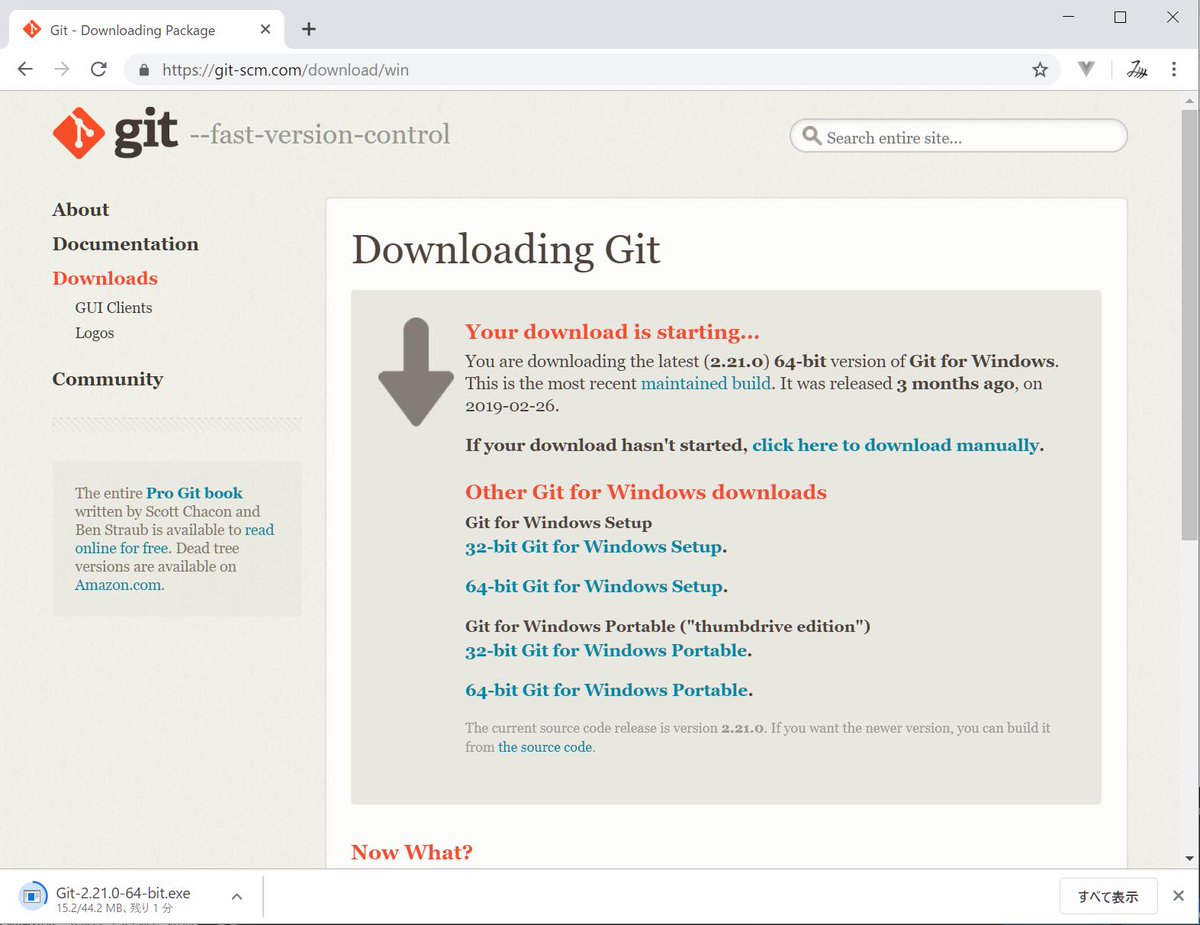 拡大
みつぎ@Webアプリ開発者、土木電気通信施工、現場仕事、5児パパ、生成系AI
@mitsugeek
拡大
みつぎ@Webアプリ開発者、土木電気通信施工、現場仕事、5児パパ、生成系AI
@mitsugeek
ダウンロードした「Git-2.21.0-64-bit.exe」を実行。 pic.twitter.com/os7EAwCm35
2019-05-21 21:31:28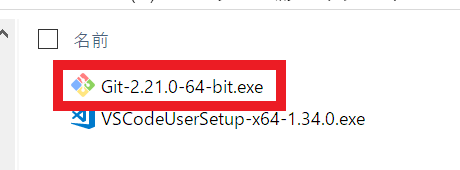 拡大
みつぎ@Webアプリ開発者、土木電気通信施工、現場仕事、5児パパ、生成系AI
@mitsugeek
拡大
みつぎ@Webアプリ開発者、土木電気通信施工、現場仕事、5児パパ、生成系AI
@mitsugeek
Nextを押下。 pic.twitter.com/33VuUkpdex
2019-05-21 21:33:12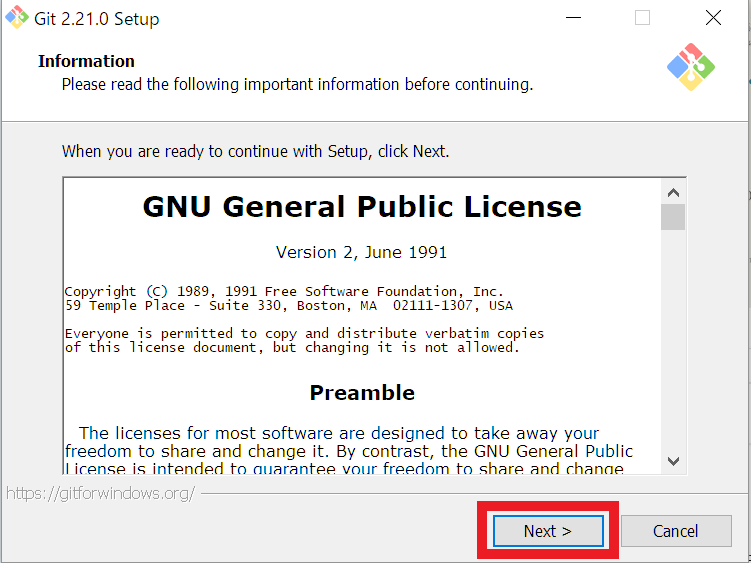 拡大
みつぎ@Webアプリ開発者、土木電気通信施工、現場仕事、5児パパ、生成系AI
@mitsugeek
拡大
みつぎ@Webアプリ開発者、土木電気通信施工、現場仕事、5児パパ、生成系AI
@mitsugeek
インストール先のパスはそのまま。Nextを押下。 pic.twitter.com/ygyoaRpDRJ
2019-05-21 21:34:29 拡大
みつぎ@Webアプリ開発者、土木電気通信施工、現場仕事、5児パパ、生成系AI
@mitsugeek
拡大
みつぎ@Webアプリ開発者、土木電気通信施工、現場仕事、5児パパ、生成系AI
@mitsugeek
設定もそのまま。Nextを押下。 pic.twitter.com/bMsR9CGsIh
2019-05-21 21:36:26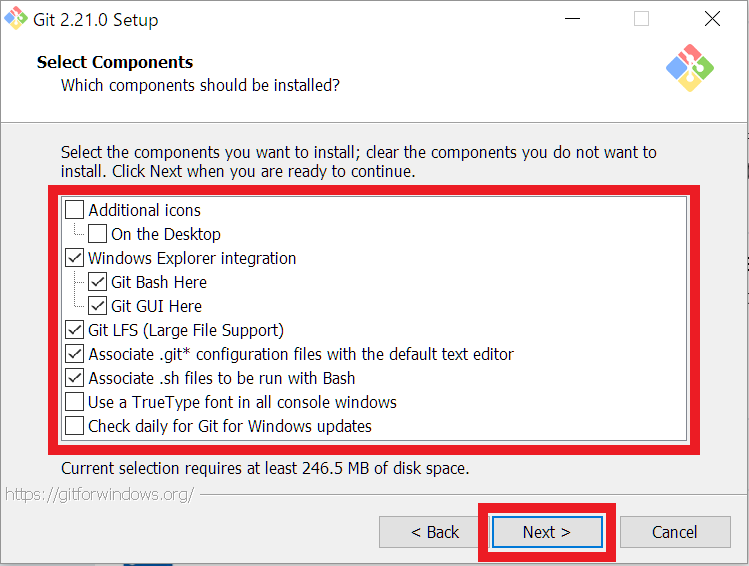 拡大
みつぎ@Webアプリ開発者、土木電気通信施工、現場仕事、5児パパ、生成系AI
@mitsugeek
拡大
みつぎ@Webアプリ開発者、土木電気通信施工、現場仕事、5児パパ、生成系AI
@mitsugeek
スタートメニューにgitのショートカットを入れるかどうか。 こちらもデフォルトのままNext押下。 pic.twitter.com/e8fJli4651
2019-05-21 21:40:20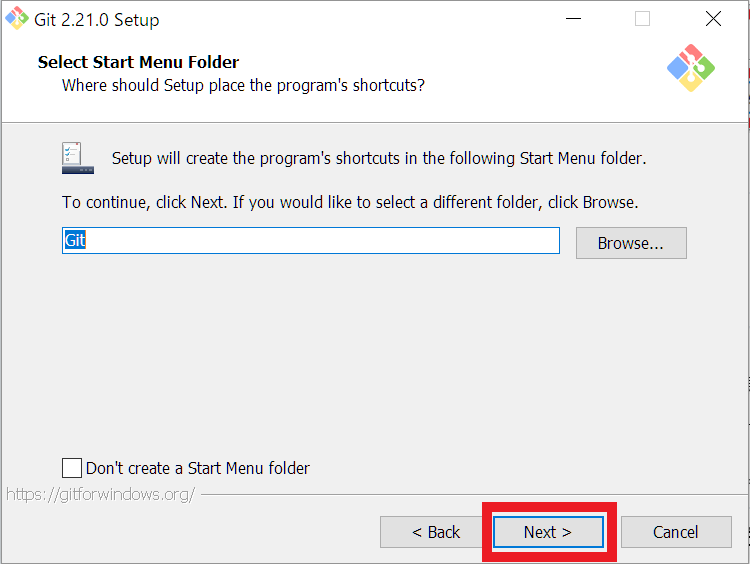 拡大
みつぎ@Webアプリ開発者、土木電気通信施工、現場仕事、5児パパ、生成系AI
@mitsugeek
拡大
みつぎ@Webアプリ開発者、土木電気通信施工、現場仕事、5児パパ、生成系AI
@mitsugeek
コミットするときの編集に使用するエディタはVisual Studio Codeを選択(デフォルトはVim)し、「Next」をクリック。 pic.twitter.com/QeLSGJfspk
2019-05-21 21:44:30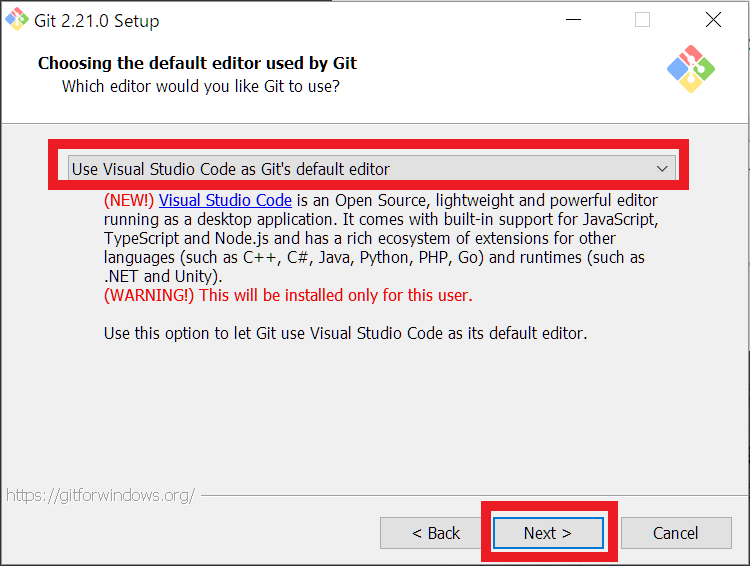 拡大
みつぎ@Webアプリ開発者、土木電気通信施工、現場仕事、5児パパ、生成系AI
@mitsugeek
拡大
みつぎ@Webアプリ開発者、土木電気通信施工、現場仕事、5児パパ、生成系AI
@mitsugeek
「Git from the command line and also from 3rd-party software」を選択(デフフォルトのまま)してNextを押下。 pic.twitter.com/nZRbFjAbh6
2019-05-21 21:48:50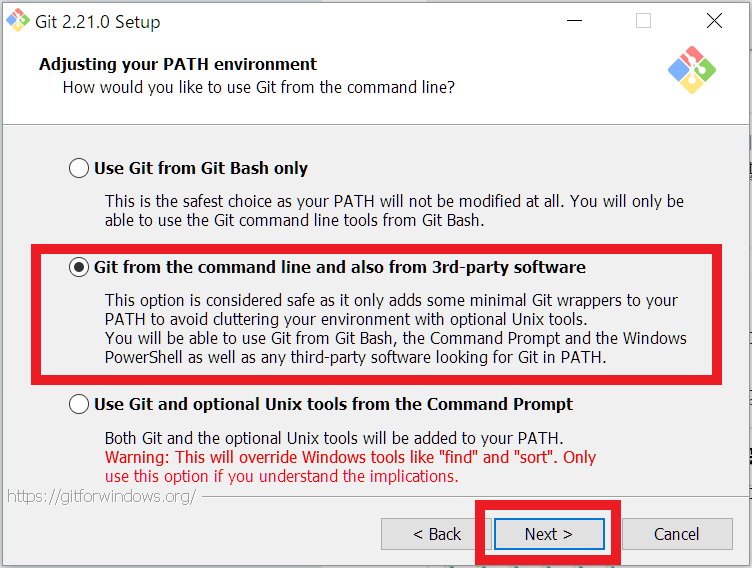 拡大
みつぎ@Webアプリ開発者、土木電気通信施工、現場仕事、5児パパ、生成系AI
@mitsugeek
拡大
みつぎ@Webアプリ開発者、土木電気通信施工、現場仕事、5児パパ、生成系AI
@mitsugeek
「Use the OpenSSL library」を選択(デフォルトのまま)してNextを押下。 pic.twitter.com/k3BK86IpXX
2019-05-21 21:51:56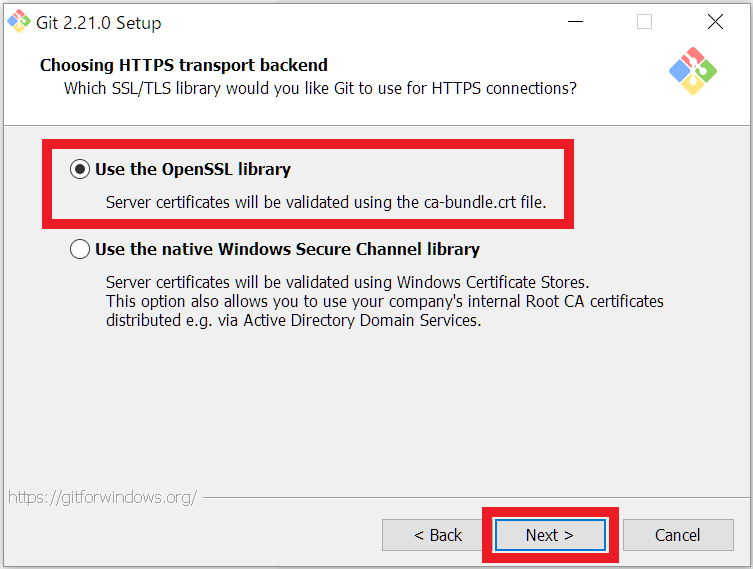 拡大
みつぎ@Webアプリ開発者、土木電気通信施工、現場仕事、5児パパ、生成系AI
@mitsugeek
拡大
みつぎ@Webアプリ開発者、土木電気通信施工、現場仕事、5児パパ、生成系AI
@mitsugeek
「Checkout as-is, commit as-is」を選択しておく。(チェックアウト時も、コミット時も改行コードはgitでは変更しない) で、Nextを押下 pic.twitter.com/OKI4wu3Kh4
2019-05-21 21:56:51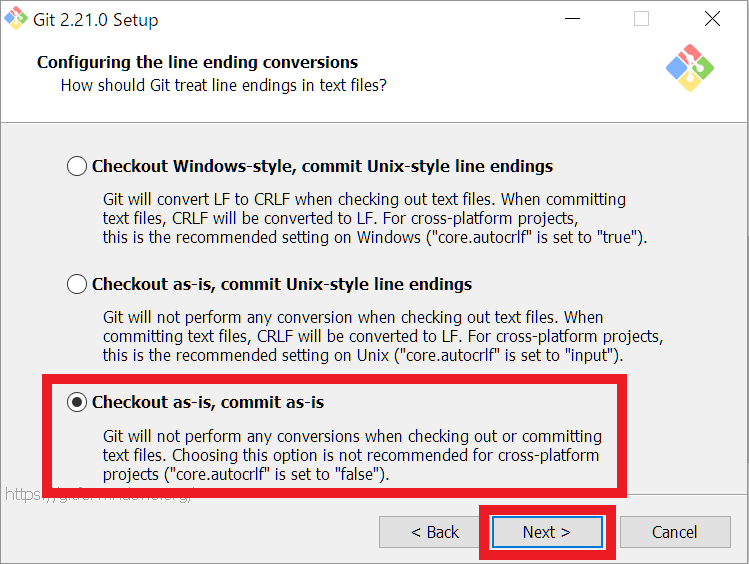 拡大
みつぎ@Webアプリ開発者、土木電気通信施工、現場仕事、5児パパ、生成系AI
@mitsugeek
拡大
みつぎ@Webアプリ開発者、土木電気通信施工、現場仕事、5児パパ、生成系AI
@mitsugeek
「Use Min TTY(the default terminal of MSYS2)」を選択(デフォルト)して、Nextを押下。 pic.twitter.com/vMznfPrs4a
2019-05-21 22:02:43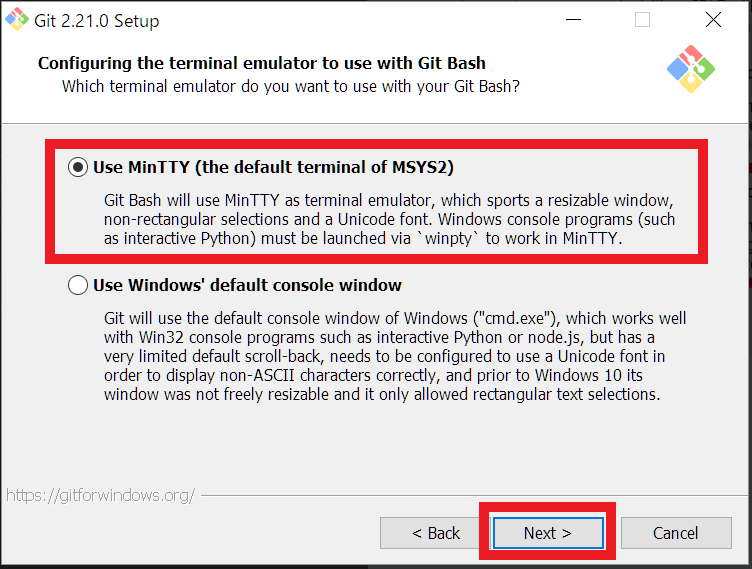 拡大
みつぎ@Webアプリ開発者、土木電気通信施工、現場仕事、5児パパ、生成系AI
@mitsugeek
拡大
みつぎ@Webアプリ開発者、土木電気通信施工、現場仕事、5児パパ、生成系AI
@mitsugeek
Configuring extra optionsの設定はそのままで、Nextを押下。 pic.twitter.com/ggRVd2x6xn
2019-05-21 22:09:19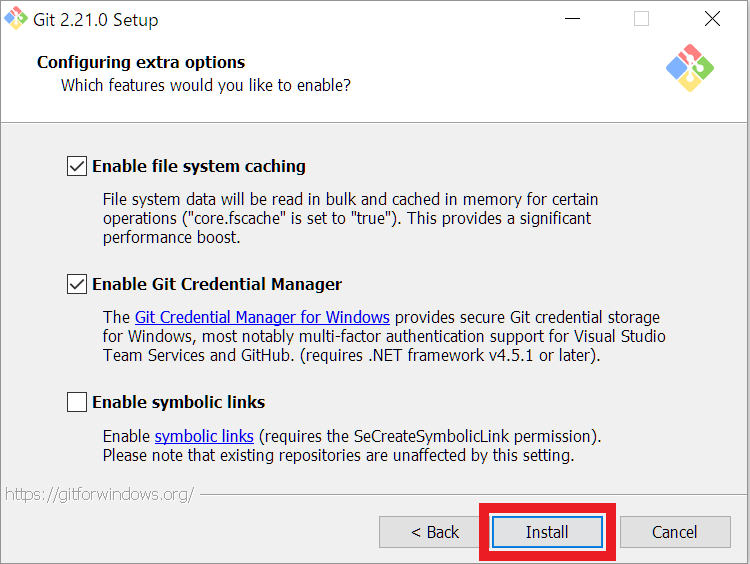 拡大
みつぎ@Webアプリ開発者、土木電気通信施工、現場仕事、5児パパ、生成系AI
@mitsugeek
拡大
みつぎ@Webアプリ開発者、土木電気通信施工、現場仕事、5児パパ、生成系AI
@mitsugeek
Git for Windows インストール中の様子。 pic.twitter.com/LPXrkaSlFa
2019-05-21 22:12:37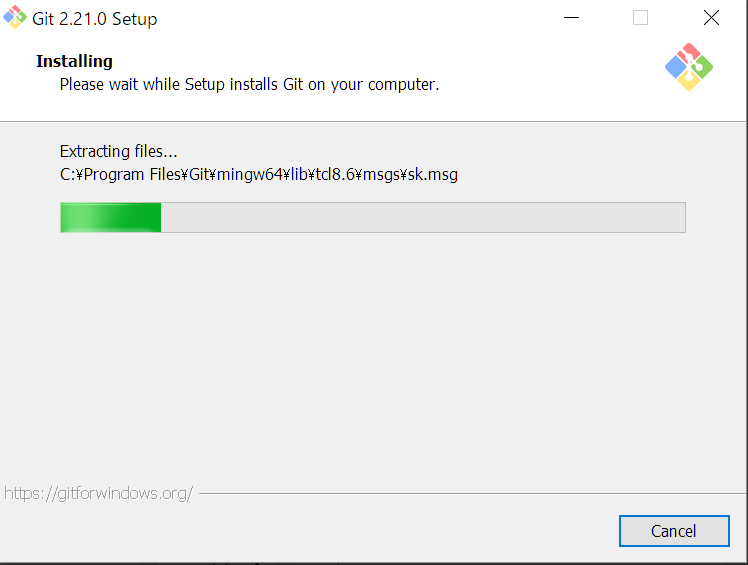 拡大
みつぎ@Webアプリ開発者、土木電気通信施工、現場仕事、5児パパ、生成系AI
@mitsugeek
拡大
みつぎ@Webアプリ開発者、土木電気通信施工、現場仕事、5児パパ、生成系AI
@mitsugeek
Finish押下で、Git for Windowsのインストール完了。 pic.twitter.com/xn39PC6Isu
2019-05-21 22:17:49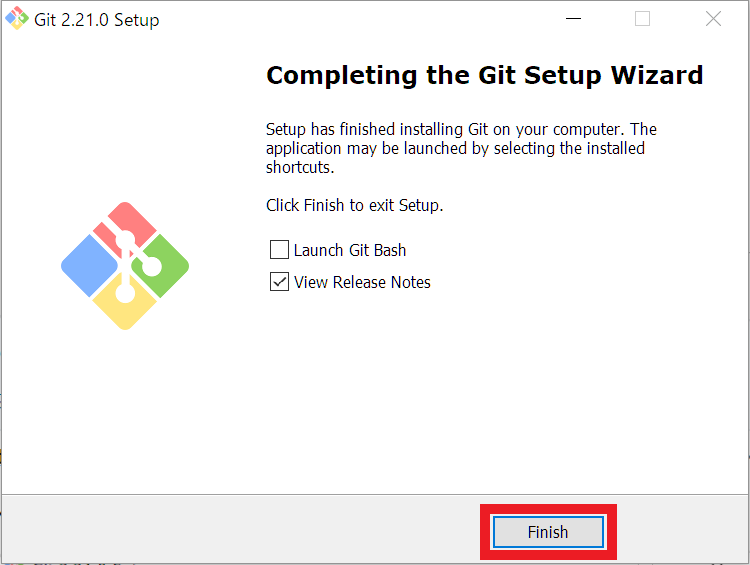 拡大
みつぎ@Webアプリ開発者、土木電気通信施工、現場仕事、5児パパ、生成系AI
@mitsugeek
拡大
みつぎ@Webアプリ開発者、土木電気通信施工、現場仕事、5児パパ、生成系AI
@mitsugeek
インストールが終わると。Git for Windows v2.21.0 Release Notesがブラウザで開く。 (View Release Notesにチェック入れてるので開く) pic.twitter.com/FO4PNdkIsD
2019-05-21 22:20:10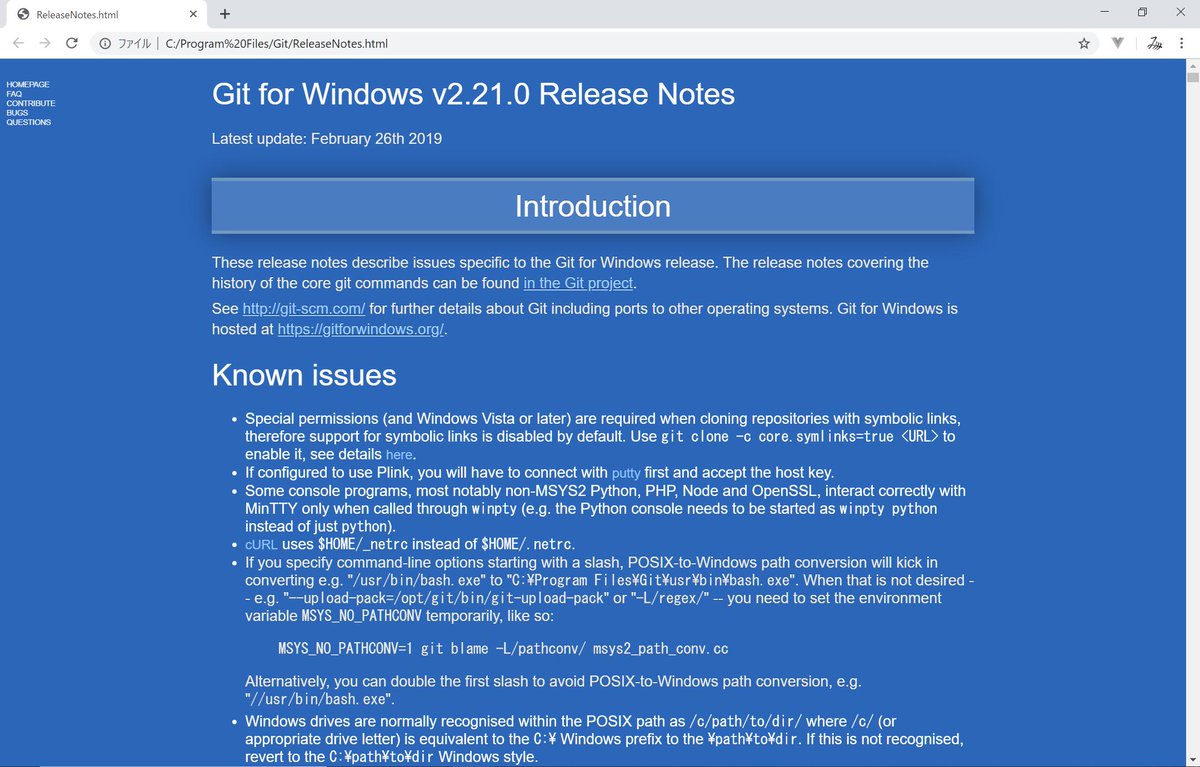 拡大
みつぎ@Webアプリ開発者、土木電気通信施工、現場仕事、5児パパ、生成系AI
@mitsugeek
拡大
みつぎ@Webアプリ開発者、土木電気通信施工、現場仕事、5児パパ、生成系AI
@mitsugeek
Visual Studio Codeを再起動すると、Gitがインストールされている状態となった。 pic.twitter.com/ddwklPti1y
2019-05-21 22:23:41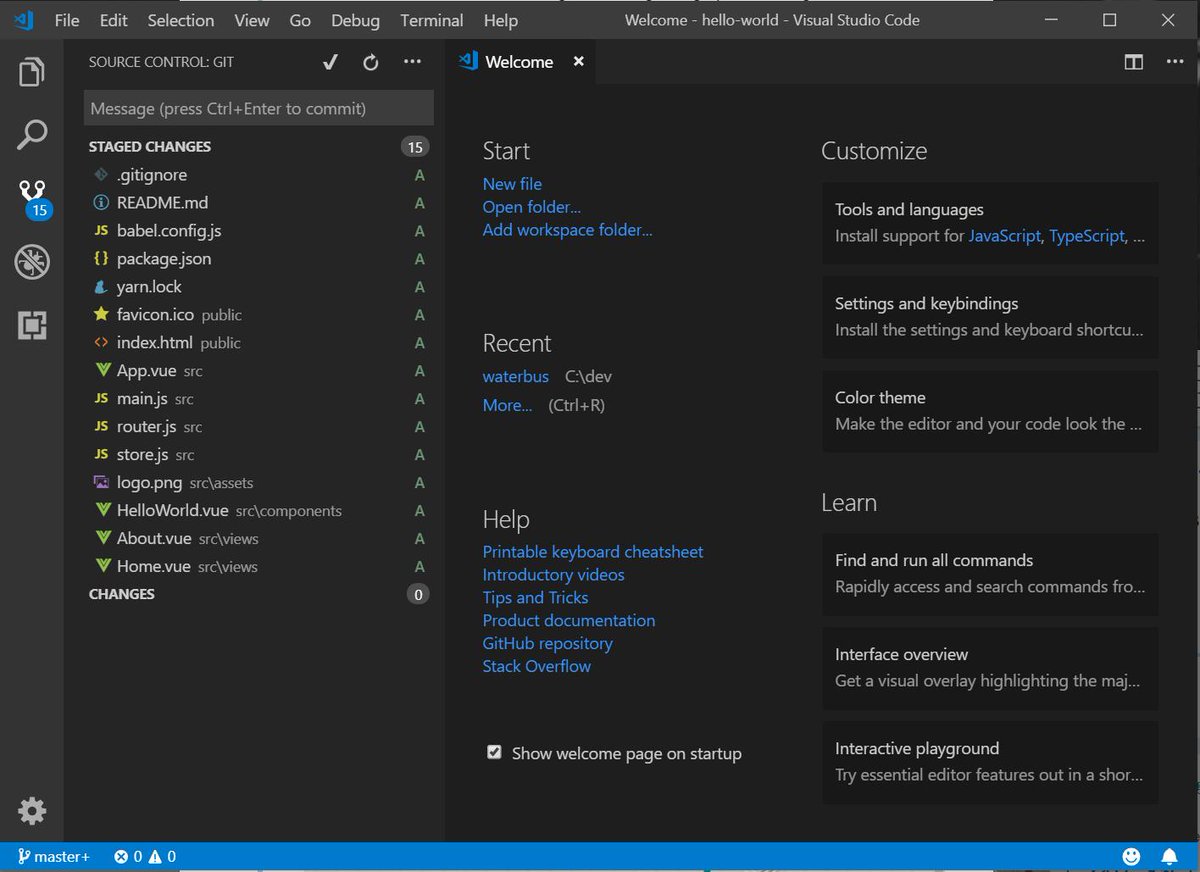 拡大
拡大